Florence Cathedral: A Timeless Marvel of Art and Architecture

Florence cathedral(Duomo)

Introduction: Nestled in the heart of Florence, Italy, the Florence Cathedral, also known as the Cathedral of Santa Maria del Fiore, stands as a testament to the city’s rich history, architectural prowess, and artistic splendor. In this post, we’ll explore the magnificence of the cathedral, its iconic artworks, and practical details for planning an enriching visit.

History and Architecture: Built over several centuries, with construction commencing in 1296, the Florence Cathedral is a masterpiece of Gothic and Renaissance architecture. Its stunning dome, designed by Filippo Brunelleschi, is an engineering marvel and remains the largest brick dome ever constructed. The intricate façade, adorned with polychrome marble panels, showcases the craftsmanship of generations.

Artistic Treasures Inside: 1. The Last Judgment by Giorgio Vasari:

Ceiling Mural, Georgio Vasari, 1572 and completed by Zuccari 1579

Adorning the interior of the dome, this fresco depicts the final judgment and is a testament to Vasari’s mastery of composition and storytelling.

2. The Baptistry Doors (Gates of Paradise) by Lorenzo Ghiberti:

Baptistry showing Ghiberti’s doors (copies). Originals in museum.

Located on the Baptistery adjacent to the cathedral, these bronze doors are a Renaissance masterpiece, showcasing scenes from the Old Testament with exquisite detail.

3. The Duomo Museum:

Michelangelo’s Deposition (incorrectly known as the Florence Pieta)

Housing original sculptures from the cathedral, the museum offers insights into the art and history of the Florence Cathedral. Visitors can marvel at Michelangelo’s unfinished Pietà and other precious artifacts.

Opening Times:

  • Cathedral: Daily from 10 a.m. to 4:30 p.m.
  • Dome: Daily from 8:30 a.m. to 7 p.m.
  • Baptistery: Daily from 8:15 a.m. to 10:15 a.m. and 11:15 a.m. to 7:30 p.m.
  • The Duomo Museum: Daily from 9 a.m. to 7 p.m. (closed on the first Tuesday of each month)

Planning Your Visit: To make the most of your visit to the Florence Cathedral, consider purchasing a combined ticket that grants access to the cathedral, dome, baptistery, and museum. Be mindful of dress codes, as visitors are expected to dress modestly when entering religious sites. Climbing to the top of the dome provides not only panoramic views of Florence but also a close-up look at the magnificent frescoes.

Experiencing Florence’s Cathedral: Wandering through the grandeur of the Florence Cathedral is a journey through time and artistic innovation. As you marvel at the architectural details, gaze upon masterpieces, and absorb the ambiance of this sacred space, you’ll find yourself immersed in the rich cultural tapestry of Florence. Advance tickets are recommended. Queues can be long especially in summer months and at weekends.

Conclusion: The Florence Cathedral stands as a beacon of art, culture, and spirituality. From its awe-inspiring architecture to the masterpieces housed within, a visit to this iconic landmark promises an enriching experience for art enthusiasts and history lovers alike. Plan your visit thoughtfully, and let the Florence Cathedral unfold its tales of centuries past before your eyes.
The Raft of the Medusa, by Théodore Géricault, an Historical Masterpiece

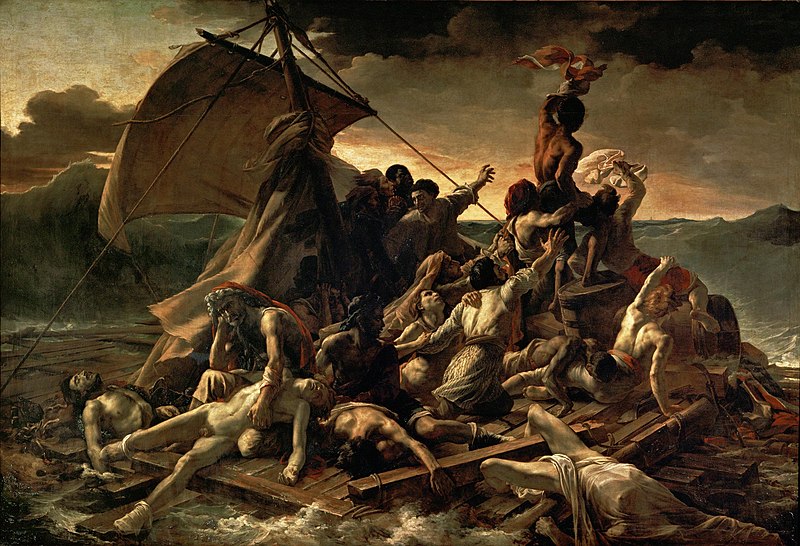
The Raft of the Medusa, Géricault, 1818-1819, Oil on canvas, Louvre, Paris

“The Raft of the Medusa,” painted by Théodore Géricault in 1818-1819, is a monumental work that stands as a seminal example of history painting in France during the 19th century. Géricault’s masterpiece captures a tragic episode from French naval history, the wreck of the frigate Medusa, and epitomizes the Romantic movement’s emphasis on emotional intensity and social commentary.

Historical Context: The painting depicts the aftermath of the wreck of the Medusa off the coast of Senegal in 1816, where survivors were left adrift on a makeshift raft. Géricault, influenced by a sensationalized firsthand account, chose to portray the human suffering, desperation, and survival instincts of those stranded at sea for thirteen days.

Romanticism and Emotional Impact: As a history painting, “The Raft of the Medusa” aligns with the Romantic movement’s rejection of classical ideals and emphasis on emotion and individual experience. Géricault’s composition is monumental and dramatic, capturing the raw intensity of the human struggle for survival. The painting’s scale and emotional power serve as a testament to the Romantic belief in art’s ability to evoke strong emotions and societal reflection.

Political and Social Commentary: Beyond its dramatic depiction of a maritime disaster, Géricault’s painting also carries a socio-political message. The Medusa incident was marred by incompetence and political corruption, and Géricault used his art to critique these failings. The painting serves as a powerful indictment of the French government’s negligence and highlights broader themes of human suffering and resilience in the face of systemic failures.

Composition and Realism: Géricault’s attention to detail and commitment to realism contribute to the impact of the painting. The carefully rendered expressions, the depiction of the human form, and the stark contrasts of light and shadow all enhance the sense of immediacy and authenticity. The composition, with its pyramidal structure and central focus on a figure waving for rescue, draws the viewer into the heart-wrenching narrative.

Legacy and Influence: “The Raft of the Medusa” has left an enduring mark on the history of art. It exemplifies the shift towards realism and social commentary in history painting and has influenced subsequent generations of artists. Géricault’s bold departure from traditional representations of historical events paved the way for a more nuanced and critical approach to storytelling through visual art.

In conclusion, Géricault’s “The Raft of the Medusa” not only encapsulates the tragic events of the Medusa shipwreck but also exemplifies the evolution of history painting in France during the 19th century. Its emotional power, political undertones, and commitment to realism make it a landmark work that continues to resonate with audiences today.

The Battle of Passchendaele, WW1

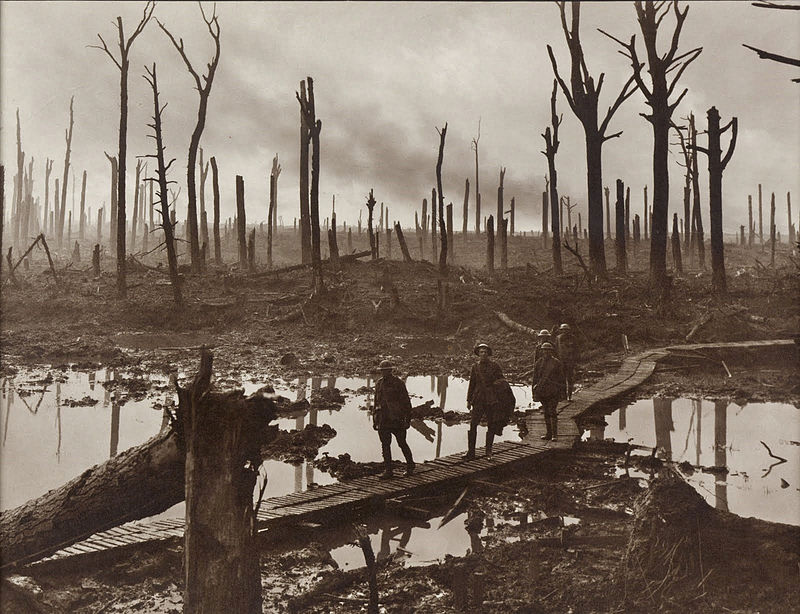
The Battle of Passchendaele, also known as the Third Battle of Ypres, was a major World War I battle fought between July 31 and November 10, 1917. It took place near the Belgian town of Passchendaele, and it was part of the larger British offensive on the Western Front. The battle is infamous for its extreme conditions, high casualties, and relatively limited gains made by the Allies.

Australian gunners on a duckboard track in Château Wood, near Hooge, 29 October 1917. Photo by Frank Hurley.

Context: By 1917, the Western Front had become a stalemate with neither side gaining significant advantage. The British High Command, led by General Douglas Haig, planned a series of offensives to break the deadlock. The Battle of Passchendaele was one of these offensives, aimed at capturing the ridges south and east of Ypres to gain strategic advantage and threaten German submarine bases on the Belgian coast.

The Battle: The battle began on July 31, 1917, with a massive British and Commonwealth artillery bombardment targeting German positions. Following the barrage, British and ANZAC (Australian and New Zealand Army Corps) troops launched attacks on the German lines. However, the prolonged and heavy rain that fell throughout the campaign turned the battlefield into a quagmire of mud, making movement difficult and impeding the effectiveness of the artillery.

The fighting was brutal and characterized by some of the bloodiest and most futile assaults of the war. The soldiers had to contend not only with enemy fire but also with the treacherous terrain. Tanks, which were relatively new at that time, were used in the battle but faced numerous challenges navigating the muddy landscape.

One of the most notable episodes during the battle was the capture of the village of Passchendaele by Canadian forces on November 6, 1917. Despite their success in taking the village, the overall gains were minimal, and the offensive was called off a few days later, officially ending on November 10, 1917.

Outcomes and Impact: The Battle of Passchendaele resulted in heavy casualties on both sides. Estimates vary, but it is believed that the Allies suffered around 275,000 casualties, while the Germans had approximately 220,000. The gains made by the Allies were meager and did not significantly alter the strategic situation on the Western Front.

The battle’s legacy has been controversial, with many considering it a costly and unnecessary campaign that achieved little in terms of military objectives. The massive loss of life and the appalling conditions faced by the soldiers have made Passchendaele a symbol of the futility and horrors of trench warfare during World War I.

In summary, the Battle of Passchendaele was a protracted and deadly struggle on the Western Front, characterized by terrible conditions and heavy casualties, with limited territorial gains for the Allied forces.

The Candian Army during WW1

During World War I, the Canadian forces had a significant and close interaction with British forces, as Canada was part of the British Empire at that time. When Britain declared war on Germany on August 4, 1914, Canada, as a self-governing dominion within the British Empire, was automatically at war as well.

Here’s how the Canadian forces interacted with British forces during WWI:

  1. Command Structure: The Canadian Expeditionary Force (CEF) was formed and placed under the command of the British Army. Canadian soldiers were ultimately under the overall direction of British High Command, but Canada was given some degree of autonomy in organizing and directing its forces.
  2. Training: Canadian troops underwent initial training in Canada and later in Britain before being deployed to the Western Front. British training facilities were often used for this purpose.
  3. Western Front: The majority of Canadian forces were deployed to the Western Front in France and Belgium. They fought alongside British troops and other Allied forces in major battles like the Battle of Ypres, the Battle of the Somme, and the Battle of Vimy Ridge.
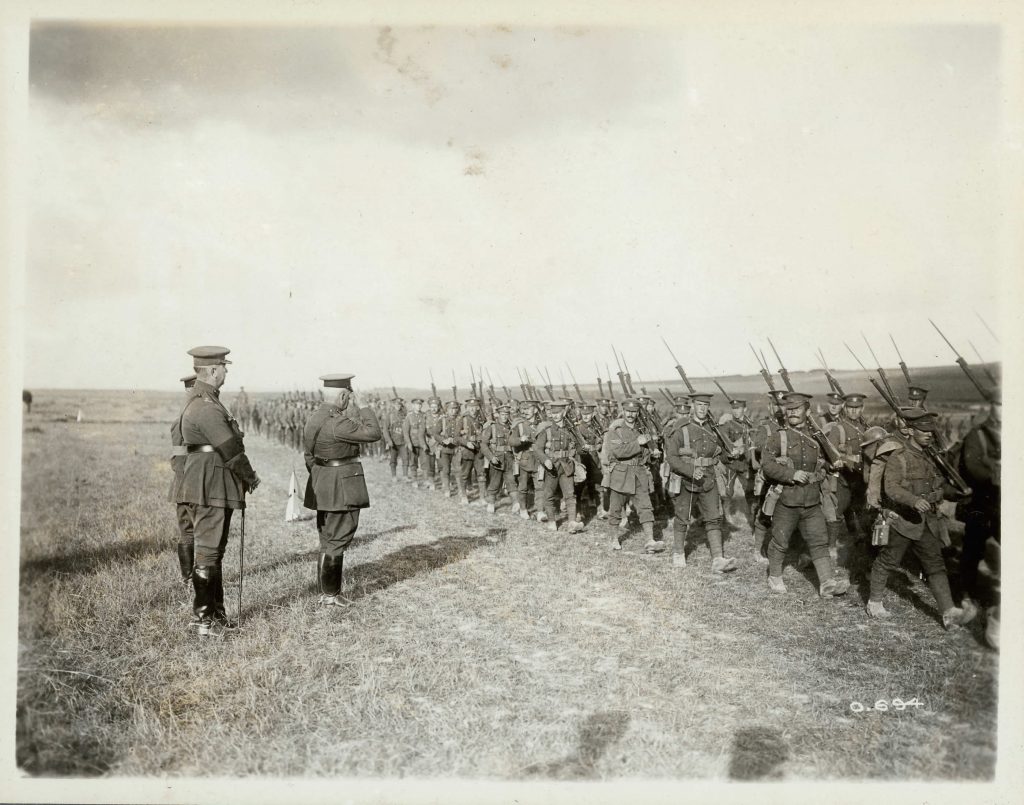
  4. Corps Formation: By 1915, the Canadian Corps was established as an independent formation within the British Army. The Corps was made up of four infantry divisions and various supporting units, all under Canadian command.
  5. Battle of Vimy Ridge: One of the most notable instances of Canadian and British cooperation was during the Battle of Vimy Ridge in April 1917. The Canadian Corps, with considerable planning and coordination, managed to capture Vimy Ridge, a heavily fortified German position, which had eluded both British and French forces earlier.
  6. Later Stages of the War: As the war progressed, the Canadian Corps was employed in various major offensives, and it gained a reputation for being a formidable and reliable force on the Western Front.
  7. Tensions and Autonomy: While Canadian forces worked closely with British forces, there were some tensions and disagreements between Canadian and British leadership. The Canadian government sought to maintain its forces’ autonomy and have Canadian soldiers led by Canadian officers as much as possible.

Canadian Corps Summer 1916

Overall, the Canadian forces’ interaction with British forces during World War I was marked by collaboration, but it also reflected Canada’s evolving sense of national identity and desire for greater independence on the world stage. The experiences and sacrifices of Canadian soldiers during the war played a significant role in shaping Canada’s future as an independent nation.

Probable Exposure of the 67th Siege Battery of the Royal Garrison Artillery unit of the British Army during WWI

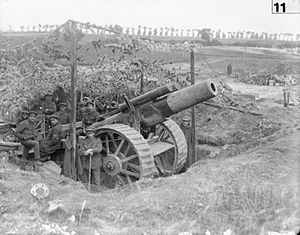
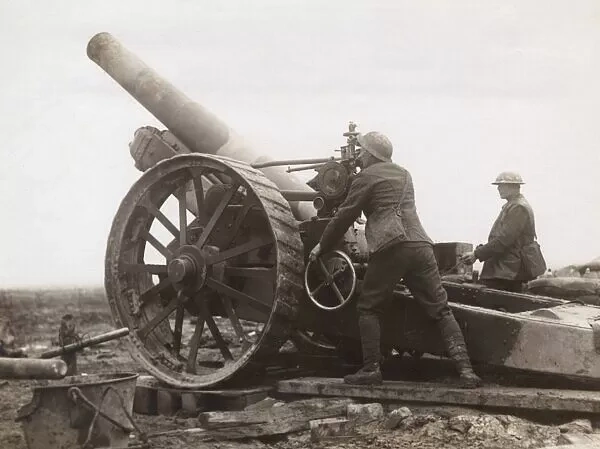
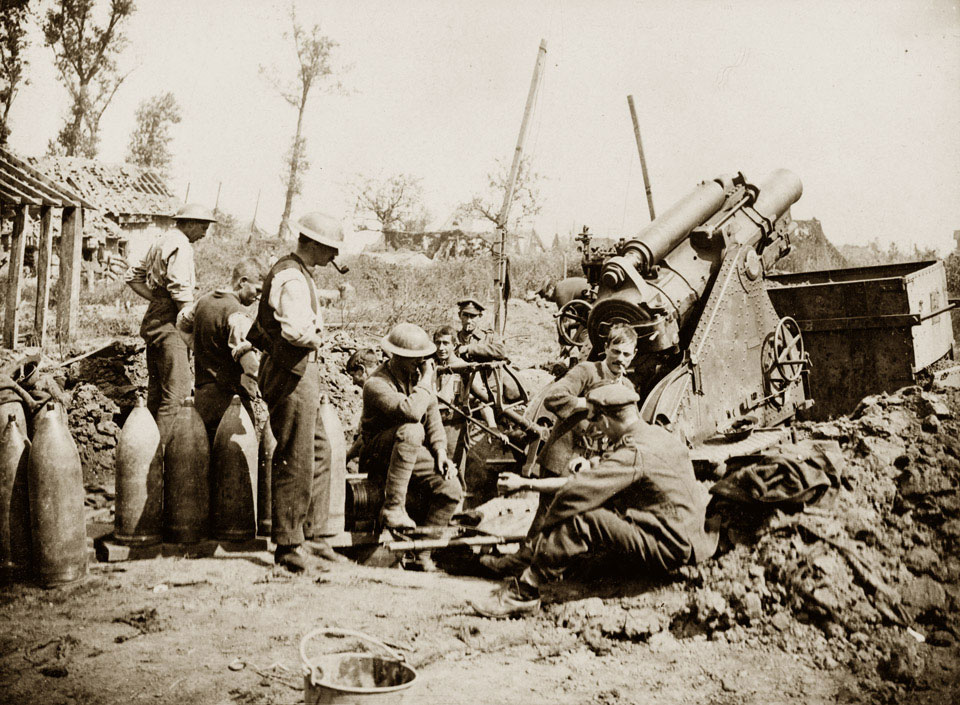
8-inch Howitzer Mk I on the Somme, July 1916

During World War I, the 67th Siege Battery was a unit of the British Royal Garrison Artillery that played a significant role in the artillery operations on the battlefields. Artillery was a crucial component of warfare during this period, and siege batteries were responsible for operating heavy guns to provide support in sieges and major offensives.

The 67th Siege Battery took part in several major battles during the war, and their actions contributed to the Allied efforts on the Western Front. Some of the notable battles and operations where the 67th Siege Battery was involved include:

  1. Battle of the Somme (1916): The 67th Siege Battery likely participated in the Battle of the Somme, which was one of the largest and bloodiest battles of the war. The Somme offensive aimed to break through the German lines and relieve pressure on the French forces at Verdun. The battery would have been involved in the intense artillery bombardments that preceded the infantry assaults.
  2. Battle of Passchendaele (Third Battle of Ypres) (1917): This was another major offensive in which the 67th Siege Battery may have taken part. The battle was characterized by the extremely difficult conditions of the Flanders mud, which posed additional challenges for artillery operations.
  3. Spring Offensive (Kaiserschlacht) (1918): The German Spring Offensive was a series of offensives launched in 1918 with the aim of breaking the stalemate on the Western Front. The 67th Siege Battery would have been involved in counter-battery fire, trying to neutralize enemy artillery to protect their own troops.
  4. Hundred Days Offensive (1918): The 67th Siege Battery likely participated in the final series of offensives by the Allies that eventually led to the end of the war. During this period, the British and their allies made significant gains and pushed the German forces back.

The role of a siege battery was to operate heavy artillery pieces, such as howitzers and mortars, which were designed to destroy enemy fortifications and strongpoints from a distance. These guns were usually large and required substantial manpower and logistics to move and operate effectively. Siege batteries were critical in softening enemy defenses before infantry assaults and played a significant role in breaking the stalemate of trench warfare.

It is important to note that specific details about the actions of individual units, including the 67th Siege Battery, may not be widely documented, and historical records can sometimes be incomplete or contradictory. However, their role, like that of other artillery units during World War I, was undoubtedly essential in shaping the outcomes of major battles and offensives during the conflict.

The Salient with respect to the Battle of the Somme

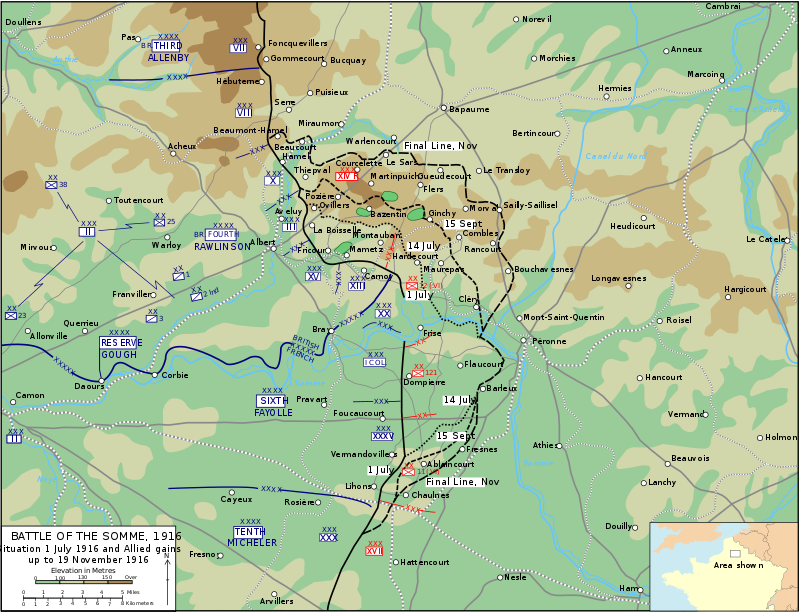
Fricourt Salient July 1916

In military terminology, a “salient” refers to a protrusion or bulge in the frontline of an army’s position into enemy territory. It is a geographical feature of the battlefield where the front lines form a concave shape, making the area vulnerable to attacks from multiple sides. During the Battle of the Somme, which took place from July 1 to November 18, 1916, the significance of the salient played a crucial role in the outcome of the battle.

The Battle of the Somme was a major offensive launched by the British and French forces against the German army during World War I. The main objective was to relieve pressure on the French forces, who were engaged in a deadly stalemate at Verdun, and to break through the German lines on the Western Front. The Somme River area in northern France was chosen as the battleground.

At the onset of the battle, the British and French forces sought to push the Germans back by attacking along a wide front. However, due to certain tactical and strategic errors, the Allies were unable to achieve a breakthrough. Instead, they ended up creating a salient in the German lines, specifically in the sector defended by the British.

The creation of this salient had several significant implications:

  1. Vulnerability: The British forces found themselves holding a position that was exposed on three sides. The Germans could concentrate their artillery fire from multiple directions, causing heavy casualties and making it challenging for the British to hold their ground.
  2. Diverted Resources: The creation of the salient forced the British to divert their troops and resources to defend the vulnerable flanks. This diversion weakened the overall strength of the British forces and hindered their ability to launch further offensives effectively.
  3. German Counterattacks: The German army recognized the strategic significance of the salient and launched counterattacks to exploit this vulnerability. These attacks aimed to push the Allies back and possibly even surround and cut off their forces.
  4. Prolonged Battle: The establishment of the salient turned the Battle of the Somme into a protracted and grueling conflict. Instead of achieving a swift breakthrough, the battle turned into a prolonged and bloody stalemate, resulting in significant casualties on both sides.

Overall, the salient at the Battle of the Somme played a critical role in shaping the nature and outcome of the conflict. It turned the battle into a much more challenging and costly endeavor for the Allies, leading to strategic realignments and costly offensives and counterattacks. The battle became a symbol of the horrors of modern warfare, with both sides suffering immense losses and gaining little strategic advantage from the prolonged and brutal fighting.

The Royal Garrison Artillary in World War I

Range finding an 8 inch Howitzer on the battlefield during WWI. Imperial War Museum.

During World War I, the Royal Garrison Artillery (RGA) was a crucial component of the British Army responsible for providing heavy artillery support on the battlefield. The RGA played a significant role in the war, employing a wide range of artillery pieces to support infantry operations, conduct counter-battery fire, and carry out other vital tasks.

Key aspects of the Royal Garrison Artillery during World War I:

  1. Role and Organization: The RGA was a specialized branch of the British Army dedicated to operating and managing heavy artillery, including large-caliber guns, howitzers, and mortars. It was responsible for defending key locations, such as ports, cities, and other strategic positions, as well as providing artillery support to the British Expeditionary Force on the Western Front.
  2. Heavy Artillery: The RGA operated a variety of heavy artillery pieces, ranging from 4.5-inch howitzers to massive 15-inch and 9.2-inch guns. These guns were used for long-range bombardments, destroying enemy fortifications, disrupting enemy lines, and providing cover for infantry advances.
  3. Trench Warfare: In the context of trench warfare on the Western Front, the RGA’s role was crucial. They were tasked with softening enemy defenses before major offensives, aiming to create breaches in the enemy lines through intense and prolonged artillery barrages.
  4. Counter-Battery Fire: The RGA also engaged in counter-battery fire, targeting enemy artillery positions and attempting to neutralize or destroy them. This was a critical task to reduce the effectiveness of enemy artillery and protect British troops.
  5. Gas Attacks: During World War I, chemical warfare, particularly gas attacks, was employed by both sides. The RGA was responsible for deploying gas shells when required, though the use of chemical weapons was highly controversial and led to devastating consequences.
  6. Coast Defense: Apart from its role on the Western Front, the RGA also played a significant role in coastal defense, operating heavy coastal artillery to protect important ports and naval bases from enemy naval attacks.
  7. Involvement in Major Battles: The RGA was involved in numerous major battles of World War I, including the Battles of the Somme, Ypres, Passchendaele, and others. Their firepower and support were instrumental in some of these battles’ outcomes.
  8. Technical and Tactical Innovations: World War I brought about significant advancements in artillery technology and tactics. The RGA was at the forefront of these developments, learning to adjust fire more accurately, use new types of ammunition, and adapt to the evolving nature of warfare.
  9. Sacrifice and Casualties: The Royal Garrison Artillery suffered significant casualties during World War I. Operating heavy guns often put artillery crews in vulnerable positions, making them susceptible to enemy counter-fire.
  10. Post-War Legacy: After the war, the Royal Garrison Artillery continued to be a vital part of the British Army, evolving alongside military technology and doctrine. However, the devastation of World War I and subsequent developments in warfare would lead to further changes in artillery tactics and organization.

The Royal Garrison Artillery’s efforts during World War I were critical to the overall success of British operations and played a vital role in the complex and challenging trench warfare on the Western Front. The sacrifices and achievements of the RGA members are remembered and honored to this day.

Battle of The Somme, France 1916 onwards

Royal Garrison Artillary Battery of the British Army. Imperial War Museum.

World War I, also known as the Great War, was a global conflict that lasted from 1914 to 1918. It involved many of the world’s major powers divided into two opposing alliances: the Allies (comprised primarily of France, the United Kingdom, Russia, and later joined by the United States) and the Central Powers (led by Germany, Austria-Hungary, and the Ottoman Empire).

The Somme is a river in northern France, and the Battle of the Somme was one of the most significant and devastating battles of World War I. It took place between July 1 and November 18, 1916, in the region known as the Somme Valley.

Key aspects of the Battle of the Somme and its relation to World War I:

  1. Context: The Battle of the Somme was part of a larger offensive by the Allies to break the stalemate on the Western Front. The Western Front was a series of trenches stretching from the North Sea to the Swiss border, where both sides were locked in a bloody and entrenched war of attrition.
  2. British Offensive: The Battle of the Somme was primarily launched by the British Expeditionary Force, with the support of French troops. The British forces aimed to relieve pressure on the French, who were heavily engaged in the Battle of Verdun, another major conflict on the Western Front.
  3. Trench Warfare and New Technology: The battle is often associated with the horrors of trench warfare. Both sides had constructed elaborate systems of trenches, barbed wire, and defensive fortifications. The British used new military technology, including tanks, which were introduced for the first time on the battlefield.
  4. Casualties: The Battle of the Somme resulted in massive casualties. On the first day alone, July 1, 1916, the British Army suffered nearly 60,000 casualties, making it the bloodiest day in the history of the British military. The battle lasted for months, and the total number of casualties, including dead, wounded, and missing, reached over one million.
  5. Limited Gains: Despite the immense loss of life, the gains made by the Allied forces during the Battle of the Somme were relatively small and did not lead to a breakthrough of the German lines. The battle ended in a strategic stalemate.
  6. Impact on Warfare: The Battle of the Somme had a profound impact on military tactics and strategy. It exposed the limitations of frontal infantry assaults against well-entrenched positions and highlighted the need for better coordination between infantry, artillery, and other forces.
  7. Symbolism and Remembrance: The Battle of the Somme became a symbol of the senseless loss of life and the horrors of war. It is remembered as a turning point in the public perception of the war and contributed to growing anti-war sentiments in many countries.
  8. Legacy: The Somme remains a place of historical significance and remembrance. Today, numerous memorials, cemeteries, and museums in the region commemorate the soldiers who fought and died during the battle.

The Battle of the Somme, along with other major battles of World War I, had a profound impact on the course of history. It contributed to the eventual defeat of the Central Powers and the redrawing of the political map of Europe. The war’s devastating consequences and the failure of the Treaty of Versailles to address underlying issues also set the stage for future conflicts, including World War II.

The Wilton Diptych in the context of European Altarpieces

The Wilton Altarpiece is an important example of a Northern European altarpiece, reflecting the artistic and religious traditions of the region during the late medieval and early Renaissance periods. As an altarpiece, it was intended to serve as the centerpiece of a church or chapel, conveying religious narratives and fostering devotion among the faithful.

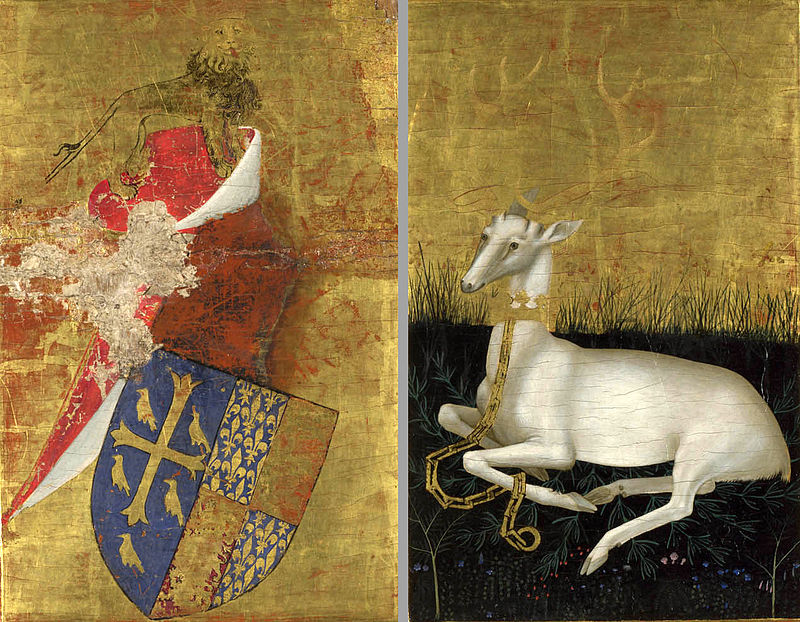
The Wilton Diptych is painted on two panels of Baltic oak, set in frames of the same material and joined by two hinges so that it may be closed to protect the inner painting. The inner faces of the panels are in excellent condition for their age, though some glazes have been lost, and the outer faces have paint losses from handling.

The painting is in tempera, the ground paint being mixed with egg yolk and laid in thin glazes. The background and many details are inlaid with gold leaf and in places the panel has been tooled beneath the gilding to enhance the decorative quality. In the panel with the Virgin and Christ Child, the garments are universally blue, the pigment coming from the semi-precious stone lapis lazuli. Richard’s robe uses vermilion, another expensive pigment. Some colours have faded; the roses in the angels’ hair would originally have been a much deeper pink, and the green grass of the outer hart panel is now much darker than when painted.

Although the figures of the two inner scenes face each other, and interact by gaze and gesture, they are set in different backgrounds. The human figures are on bare rocky ground, with a forest behind, and a gold leaf “sky” decorated with a pattern made by a metal punch. The heavenly figures stand in a flowery meadow, behind which is a gold background patterned by a different punch.

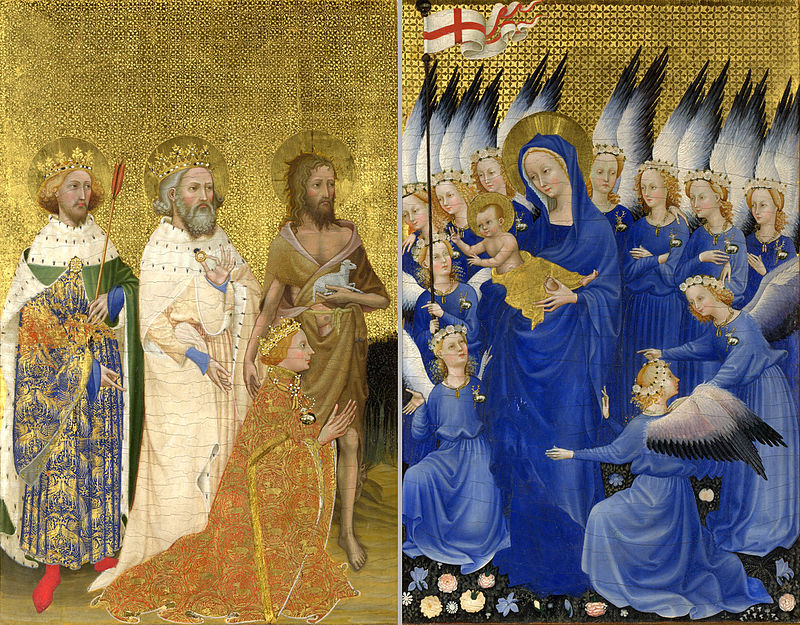
The Wilton Diptych, c. 1395–1399. Each panel is 53 cm (21 in) x 37 cm (15 in). National Gallery, London.

In the left inner panel the kneeling King Richard II is presented by Saints John the Baptist, Edward the Confessor and Edmund the Martyr, each holding their attribute. In the right-hand panel the Virgin Mary with the Christ Child in her arms is surrounded by eleven angels, against a golden background and field of delicately coloured flowers.

Richard’s outer robe is of cloth of gold and red vermilion, the fabric decorated with his personal device of the white harts and sprigs of rosemary, the emblem of his wife Anne of Bohemia, who died in 1394. Around his neck is a gold collar with broomscods, seed-pods of Cytisus scoparius, the common broom, which is the planta genista that gave Richard’s Plantagenet dynasty its name. They were also the emblem of Charles VI of France, whose daughter he married in 1396. Richard had been given such a collar by Charles in 1393, and wearing one here may indicate a date for the work after Richard’s second marriage to the six-year-old Isabella of Valois in 1396. The livery badges worn by both Richard and the angels appear to be made in the fashionable and expensive technique of ronde bosse white enamel on gold; they are comparable to the surviving Dunstable Swan Jewel, probably given by one of Richard’s cousins in the House of Lancaster. Richard’s badge, but not those of the angels, has pearls tipping the antlers, and may perhaps be based on one of several examples recorded in his treasure roll of 1397, which had pearls and a bed of emeralds for the hind to sit on. A hart badge of Richard’s inventoried in the possession of Duke Philip the Good of Burgundy in 1435 was set with 22 pearls, two spinels, two sapphires, a ruby and a huge diamond.

The Wilton Diptych, c. 1395–1399. Each panel is 53 cm (21 in) x 37 cm (15 in). National Gallery, London.

In terms of style, the Wilton Altarpiece exhibits characteristics common in Northern European art of the time. The figures are portrayed with a high degree of naturalism, emphasizing individualized facial features and attention to detail. The use of vibrant colors and meticulous rendering of textures, such as the delicate folds of clothing, further exemplify the meticulous craftsmanship associated with Northern European painters.

Northern European altarpieces like the Wilton Altarpiece played a crucial role in the religious and cultural life of the communities they were created for. They functioned as focal points of devotion and served as aids for contemplation and prayer. The movable panels allowed for a varied display of religious narratives, enabling the faithful to engage with different aspects of their faith.

Furthermore, altarpieces such as the Wilton Altarpiece often incorporated complex iconography and symbolism, making them educational tools for the illiterate or less educated members of society. Through visual storytelling, these altarpieces conveyed biblical stories and theological concepts, reinforcing religious teachings and fostering a deeper understanding of the faith.

In conclusion, the Wilton Altarpiece stands as a noteworthy example of a Northern European altarpiece. Its emphasis on naturalism, relatable portrayals of religious figures, and the inclusion of narrative scenes demonstrate the distinctive characteristics of Northern European religious art during the late medieval and early Renaissance periods. These altarpieces were not only artistic masterpieces but also played a vital role in shaping the religious and cultural landscape of Northern Europe.

Piet Modrian and his Philosophy of Modern Art

Tableau I, 1921, Kunstmuseum Den Haag

Piet Mondrian, a Dutch painter and one of the pioneers of abstract art, developed a distinctive philosophy on art that is often referred to as neoplasticism or the “De Stijl” movement. Mondrian’s philosophy was deeply rooted in his belief in the spiritual and transformative power of art. His ideas not only influenced his own work but also had a significant impact on the development of modern art as a whole.

Central to Mondrian’s philosophy was the idea that art should strive to achieve a universal harmony and order. He believed that through the use of abstract forms, colors, and lines, artists could express the fundamental principles of the universe and create a sense of balance and tranquility. Mondrian sought to distill the essence of reality into its purest form, removing any unnecessary elements and reducing everything to its essential geometric components.

For Mondrian, art was a means to transcend the physical world and access a higher spiritual realm. He believed that by simplifying and organizing the visual elements, artists could tap into a universal energy or truth that lay beneath the surface of appearances. He aimed to create a sense of dynamic equilibrium, where the tensions between opposing elements—such as horizontal and vertical lines, primary colors and neutrals—could be resolved.

New York City (1942), Paris, Centre Pompidou.

Mondrian’s artistic philosophy also emphasized the concept of “plasticity,” which referred to the dynamic relationship between elements within a composition. He believed that the interplay between positive and negative space, color contrasts, and the rhythmic arrangement of lines could generate a sense of movement and energy. This idea of plasticity reflected his belief in the interconnectedness and interdependence of all things.

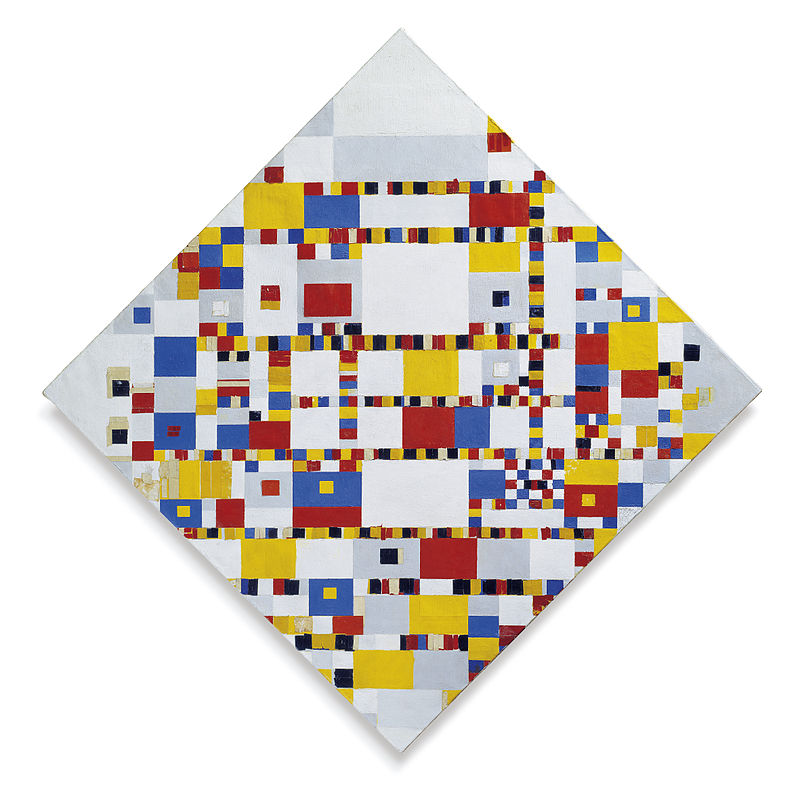
In practice, Mondrian’s philosophy manifested in his iconic paintings featuring grids of black lines intersecting with blocks of primary colors. These compositions, often referred to as his “grid paintings” or “Compositions,” aimed to evoke a sense of harmony and equilibrium through the careful placement and balance of geometric forms. Mondrian’s use of primary colors—red, blue, and yellow—symbolized the fundamental elements of the universe, while the black lines represented the dynamic tension and structure.

Victory Boogie Woogie (1942–1944), Kunstmuseum Den Haag

Mondrian’s philosophy had a profound influence on the development of modern art and design. His ideas resonated with artists and designers who sought to break away from traditional representational forms and explore the potential of abstraction. The principles of neoplasticism and Mondrian’s emphasis on simplicity, balance, and harmony continue to inspire artists, architects, and designers to this day.

Overall, Piet Mondrian’s philosophy on art emphasized the pursuit of universal harmony, spiritual expression, and the reduction of visual elements to their essential forms. His work and ideas played a pivotal role in shaping the trajectory of modern art, and his legacy continues to be celebrated and studied by artists and art enthusiasts worldwide.